Vue.js + node.js + Mysql |데이터 화면에 추출하기(part 2)
1. frontend
추가적으로 cd frontend로 가서 yarn을 설치한다.
npm install -g yarn //npm과 yarn은 js패키지인데 js 모듈을 설치할 수 있는 명령어다. yarn을 설치한 것
https://joshua1988.github.io/web-development/vuejs/vuex-start/
Vuex 시작하기 1 - Vuex와 State
Vue 중급으로 레벨업 하기. 상태 관리란 무엇인가? Vuex를 이용한 상태 관리. state 소개
joshua1988.github.io
cd frontend
npm run serve
ctrl + c 후 서버를 끄기 y
cd..
2. backend (express)
이후에 내용이 조금 수정이 되었다. 이전에 만들어 두었던 backend 폴더를 삭제하고
다시 만든다.
npm install -g express-generator //express 설치
npm install
express --view=pug backend //express의 언어를 pug로 하겠다, backend 폴더 생성
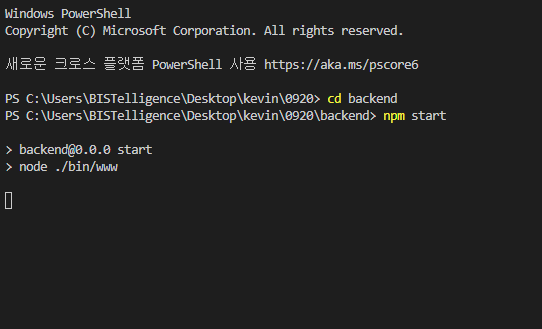
cd backend
SET DEBUG=backend:*
npm start // 디버그 확인 해보고 백엔드 서버 실행
3. frontend 의 창을 백엔드 창에 보이게 하기 (프론트 엔드와 백엔드의 연동)
08.25/ vue+express(node.js)+Mysql 개발 환경 세팅하기 part1
Vue.js 로는 웹페이지를 UI UX 및 데이터요청을 싱글페이지 구성을 위해 사용. Express.js는 Oracle,Mysql 같은 DB에 접근하기 위해 사용 Tool > Vscode Vscode 터미널에서 진행 1.Backend 설정 express --ejs ba..
reactvue.tistory.com
Configuration Reference | Vue CLI
Configuration Reference Global CLI Config Some global configurations for @vue/cli, such as your preferred package manager and your locally saved presets, are stored in a JSON file named .vuerc in your home directory. You can edit this file directly with yo
cli.vuejs.org
4. backend 에 mysql 연동하기
사전에 mysql workbench 설치 후에 스키마 테이블 작성 한다.
cd backend
npm install mysql --save // mysql 사용을 위한 라이브러리 설치
설치 후 backend/routes/users.js는

이처럼 되어 있을 텐데 이를.
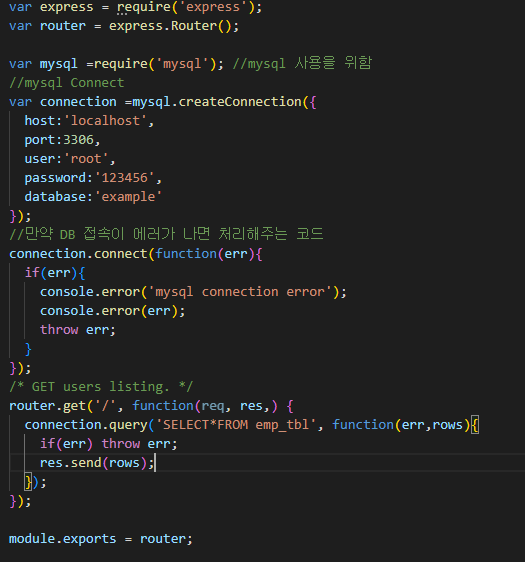
이처럼 바꾼다.
error 없이 잘 동작하면 완료 된 것이다.

진짜 연결 된게 맞아? 라고 의심이 든다면, password 부분을 바꿔보자 나는 123456이였으니 12345로 바꿔서 저장 후 실행하면

바로 에러가 나온다. 그러니까 error 없으면 DB 연결된게 맞다.
근데 에러가 나오면 아래 링크를 보고 해결하자.
https://marshmello.tistory.com/65?category=1158454
[PWA] Vue.js + Express + MySQL 연동 2
저번글에서는 vue.js와 Express로 프론트엔드와 백엔드 간의 통신 방법을 다뤄보았습니다. marshmello.tistory.com/64 [PWA] Vue.js + Express + MySQL 연동 1 1. 프로젝트 생성 비쥬얼스튜디오 코드 실행..
marshmello.tistory.com
API 통신을 위해 frontend 와 backend 경로로 가서 npm install axios --save 명령을 실행하여 , axios 패키지를 설치하자.
2022-09-07 기준 나는 backend는 오류 없이 잘 설치 되었지만 frontend 는 error가 떴다.
npm ERR! code ERESOLVE
npm ERR! ERESOLVE could not resolve
npm ERR!
npm ERR! While resolving: @vue/eslint-config-standard@6.1.0
npm ERR! Found: eslint-plugin-vue@8.7.1
npm ERR! node_modules/eslint-plugin-vue
npm ERR! dev eslint-plugin-vue@"^8.0.3" from the root project
npm ERR!
npm ERR! Could not resolve dependency:
npm ERR! peer eslint-plugin-vue@"^7.0.0" from @vue/eslint-config-standard@6.1.0
npm ERR! node_modules/@vue/eslint-config-standard
npm ERR! dev @vue/eslint-config-standard@"^6.1.0" from the root project
npm ERR!
npm ERR! Conflicting peer dependency: eslint-plugin-vue@7.20.0
npm ERR! node_modules/eslint-plugin-vue
npm ERR! node_modules/@vue/eslint-config-standard
npm ERR! dev @vue/eslint-config-standard@"^6.1.0" from the root project
npm ERR!
npm ERR! Fix the upstream dependency conflict, or retry
npm ERR! this command with --force, or --legacy-peer-deps
npm ERR! to accept an incorrect (and potentially broken) dependency resolution.
npm ERR!
npm ERR! See C:\Users\BISTelligence\AppData\Local\npm-cache\eresolve-report.txt for a full report.
npm ERR! A complete log of this run can be found in:
확실친 않지만 node버젼이 최신이 아니거나, vue 버젼이 달라서 그런 것이 아닐까로 의심한다.
새롭게 node버젼을 설치하는 힌트는 아래 카톡내용을 참고해보자. 나는 일단 진행하진 않았다.

간단하게 설치하는 방법은
npm install axios --save --force 로 일단 설치 할 수 있다.
npm install axios --save --legacy-peer-deps 로도 설치 할 수 있다. .차이는 찾아보자
이번에는 --legacy-peer-deps로 설치했다.

설치 완료 후 frontend/src/main.js를 가보면


이렇게 바꿔준다.
5.라우터 설정하기.
설정하기전에.

이 확장 라이브러리를 깔자.
.Vue 파일을 읽을 수 있게 한다.
라우터 설정하기 전에. frontend와 backend가 잘 동작 하는지 확인해본다.

frontend 는 OK
backend 도 OK
라우터 설정하려면 components 가 더 있어야 만지기에 용이할 것 같으니, components를 하나 더 만들어준다.
HelloWorld.vue 내용 그대로 가져왔다. 파일 이름은 HeaderGun.vue

그래도 서로 다름이 있어야 하니 HeaderGun.vue를 깔끔하게 만들어보자.

이처럼 되어 있는 것을 데이터를 보이게 하기 위해 바꿔준다. 여기서 나는 mysql의 emp_tbl에 sname 과 sename의 속성을 가져왔다.

frontend의 Views 로 가서 아래와 같이 작성해준다. 만약 에러가 많이 뜬다면, 그것은 ESLint의 문법 문제인데
이는 스페이스를 잘 띄어 쓰거나, 엔터를 잘 입력하거나, 규칙에 맞게 작성하면 된다. 생각보다 간단하니 직접해보길 바람

다했으면 터미널을 켜고
npm run build

에러가 안뜬다면
새로 터미널을 켜서
cd backend
npm start
하고 localhost:3000 을 가서 About 링크를 누르면

내가 Mysql의 DB에 있던 내용이 나오는 것을 확인 할 수 있다.